

In the following guide, the configuration to use nginx as a reverse-proxy for multiple web applications will be documented.
Definition
NGINX
nginx is a free and open-source web server which can also be used as a reverse proxy, a load balancer, a mail proxy and/or as HTTP cache. Its popularity is growing, is well documented, and offers good performances.
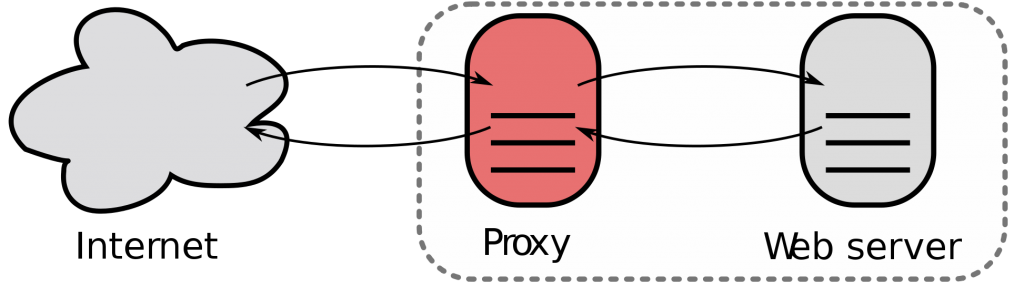
Reverse Proxy
A reverse proxy retrieves resources on behalf of a client from one or more servers, with these resources returned to the client as if they originated from the Web server itself.
Install nginx
On Ubuntu and Debian systems, nginx can be installed via:
$ sudo apt-get update
$ sudo apt-get install nginx
On RedHat and CentOS systems, nginx can be installed via:
$ sudo yum install nginx
The common commands to start, stop, and reload nginx configuration are:
# Starts nginx service
$ sudo systemctl start nginx

# Stops nginx service
$ sudo systemctl stop nginx

# Reload nginx configuration without service interruption
$ sudo service nginx reload
Configuring a web server
Once nginx installed, and a domain was purchased, and its DNS is pointing to the IP address of the web server running nginx, it can be configured in nginx simply via a file, /etc/nginx/nginx.conf. This configuration will look like the following, which will answer all request coming through the port and serve the default nginx page:
server {
    listen 80 default_server;
    listen [::]:80 default_server;
}
Reverse-Proxy to Web Application(s)
nginx configuration for a web-application can be added in a file located in /etc/nginx/conf.d/ with the .conf extension. The advantage of this method is it allows to have multiple web-applications configured easily, without editing other files than the one for the specified application, easing automation.
The following example will forward the request to a web application running locally on the port 8080:
location / {
    include proxy_params;
    proxy_pass http://0.0.0.0:8080/;
}
The reverse-proxy configuration in the file/etc/nginx/nginx.conf can now be modified to import all the configuration files on this server:
server {
    listen 80 default_server;
    listen [::]:80 default_server;

    include /etc/nginx/conf.d/*.conf;
}
And the nginx configuration reloaded pickup the changes:
$ sudo service nginx reload
Setup SSL for your domain
The last step is to encrypt your traffic using SSL via a free service LetsEncrypt and an open-source tool CertBot. Once an account was created, with LetsEncrypt, follow the instructions specific to your distribution and web server to create the SSL certificates locally using CertBot.
On Ubuntu with nginx, these instructions will be to install CertBot:
$ sudo apt-get update
$ sudo apt-get install software-properties-common
$ sudo add-apt-repository ppa:certbot/certbot
$ sudo apt-get update
$ sudo apt-get install python-certbot-nginx
Then configure the SSL certificates with:
$ sudo certbot --nginx
Follow the steps of the configuration to fill your domain information in CertBot, which will edit your existing /etc/nginx/nginx.conf configuration file, and ensure all requests are handled via SSL on the port 443 instead of in clear via the port 80. The configuration will now look like the following:
server {
    listen 80 default_server;
    listen [::]:80 default_server;

    include /etc/nginx/conf.d/*.conf;
}

server {
    server_name <domain.com> <www.domain.com>;                          # managed by Certbot

    listen [::]:443 ssl ipv6only=on;                                    # managed by Certbot
    listen 443 ssl;                                                     # managed by Certbot

    ssl_certificate /etc/letsencrypt/live/<domain.com>/fullchain.pem;   # managed by Certbot
    ssl_certificate_key /etc/letsencrypt/live/<domain.com>/privkey.pem; # managed by Certbot
    include /etc/letsencrypt/options-ssl-nginx.conf;                    # managed by Certbot
    ssl_dhparam /etc/letsencrypt/ssl-dhparams.pem;                      # managed by Certbot

    include /etc/nginx/conf.d/*.conf;
}

server {
    if ($host = <www.domain.com>) {
        return 301 https://$host$request_uri;
    }                                       # managed by Certbot


    if ($host = <domain.com>) {
        return 301 https://$host$request_uri;
    }                                       # managed by Certbot


    listen 80 ;
    listen [::]:80 ;
    server_name <domain.com> <www.domain.com>;
    return 404;                             # managed by Certbot
}
Backup
Ensure your regularly backup securely the /etc/letsencrypt/ directory which contains your certificates which are regularly modified after a renewal.