

Website hosting as became simple and affordable, so much so that you don’t even need to purchase a website hosting anymore, but instead, for few $$$ per month, use a platform such as WordPress , you will be ready to publish content nearly immediately, after some time spent in achieving the look you need.
However, how do you host multiple projects that each requires particular technologies that aren’t bundled by default in common hosting providers? The solution is to purchase a private server that will let you have full control to allow you any required dependencies.
There’s multiple providers of virtual private server (VPS), which are all becoming cheaper and more powerful with time. In this article, we will look at purchasing an Ubuntu server from Amazon Web Services (AWS) as LightSail image. AWS was selected as it is currently the market leader for such services, and we choose the LgihtSail which comes as monthly flat-fee to avoid exponential costs. Finally, Ubuntu is the operating system of choice to allow portability to other cloud providers if we ever wish to switch.
Purchase a server in AWS
- Connect to Amazon AWS, and create an account using your Credit Card details
- Select the Free Tier, which will provide 12 months discount on multiple service and basic usage
- Purchase a LightSail server
- Create SSH key, download the PEM file, and store it securely (if possible on a safe external media)
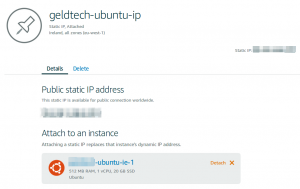
- Create Static IP
Configure your very own server in AWS
Congratulations, You have now full access to your very own server hosted in AWS! Follow the steps below to tailor its configuration to your tastes and needs:
- Connect to the server either:
- Via the Web Console directly in AWS Console, or
- Via SSH, using the username (ubuntu by default on an Ubuntu server), and the PEM file as the SSH Key provided:
ssh -i /home/username/path/to/secret-key.pem ubuntu@<SERVER_IP_ADDRESS>
- Install the minimum packages that you dimmed mandatory (htop, vim, ipython …etc)
sudo apt install htop vim ipython # add other packages
- Configure the prompt and MOTD to your convenience
- Install your personal dot files
- Run a small server as a tracing bullet, to ensure your are able to reach it
Purchase a Domain
There’s multiple providers of domains names that allow to access your machine and service easily without to have to remember IP addresses, and identify your brand uniquely.
Most of the .com extensions are now taken, but with a bit of patience, you may find the best offer for a suitable domain name in common providers such as: 1&1, GoDaddy, Amazon Route 53, and Google Domains.
Google Domains
Google Domains was selected as an example, purely on personal preferences, but any other provider would have been suitable. Define your requirements clearly in advance, and compare information online. For example, registering a mail server can be tricky and, if needed, if should be carefully researched in advance to avoid bad surprises.
- Connect to Google Domains
- Enter the keywords corresponding to the area your domain will be used for:
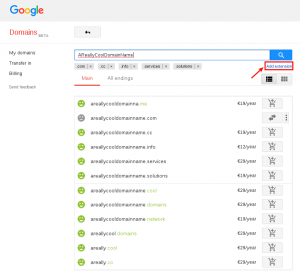
- Once you identified a domain name free, with a satisfying name and an adequate .TLD extension, select and purchase it.
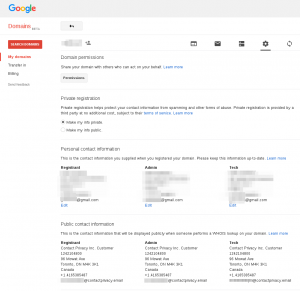
- In the registration form, you will be required to enter your personal and billing details, but ensure to select the option to hide these details from the public.
- After the purchase, your Google Domains settings page should look like the following:
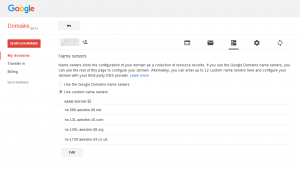
- You can now, configure the DNS servers provided by Amazon to link your domain name to your server, with Amazon DNS servers managing every request made for your domain:
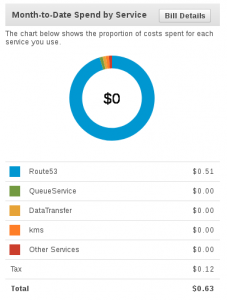
- In Amazon AWS Billing page, be aware that Route 53 will require a -albeit small- fee to provide the DNS service:
Conclusion
That’s all. folks! The new server is up and running. After a short interval, the DNS servers should have replicated the domain name to the server IP address, and it should be accessible using your own domain name.