

“DNA is like a computer program but far, far more advanced than any software ever created.”
— Bill Gates
The source code is the DNA of your software, it defines its behaviour and how it reacts to your actions, system states, and to requests external to your systems. It is your pride and joy and you want the world to discover how great what you have made is! But how will you let potentially millions of people access your creation? Bintray!
Bintray
Bintray is service provided by JFrog, the company being Artifactory, which offers native support for all major package formats and allows to work seamlessly with industry standard tools.
Contrary to Artifactory, intended to be used as a development-time tool, Bintray is a release and distribution tool. It provides a global distribution network (CDN) to replicate your packages across the world, high-throughput for downloads, redundancy to ensure high-availability, and support for end-user licenses.
In this article, we are going to study the process to build source code from GitHub using Travis CI to upload to Bintray to allow distributing your software to users all around the world. All 3x are free for open source projects, but have enterprise and private subscription model for all business models.
This article is targeted to the Debian platform and its .deb packages, which are commonly used in Debian systems, Ubuntu systems, and Raspbian systems (Raspberry Pi). These steps can be replicated or adapted to distribute other types of packages, such as RPM packages that are used by the enterprise distribution Red Hat and its community version CentOS, or such as a more generic .zip and .tar.gz archives by selecting a different setting when creating a repository.
Build, Package, Distribute
The first step to distribute your software is to have a source code repository to build and distribute.
A good place to store your code is in GitHub, a reliable tool based on git, the distributed version control system created by Linus Torvalds, the creator of Linux, which , like Linux, is widely used in numerous open sources projects, becoming a a defacto industry standard.
Another positive point of storing your source code under GitHub is that it integrates directly with Travis CI, a 3rd-party service that we will used compile and build your source code, run unit tests, and package your software, as a Debian package in our example. The created Debian package will then be uploaded to Bintray directly from Travis, allowing your software(s) to be installed by anyone via a simple apt-get command.
Travis CI is going to orchestrate the build and release pipeline directly from GitHub using a single file: .travis.yml. Within this file, the way the software is built, tested, packaged, and distributed is controlled centrally.
Using a services such as GitHub, Travis, and Bintray have multiple advantages, but it mainly removes the need to maintain the infrastructure, sources, build, and repository servers. It also reduce the time to start of a team, and make it easy to share your work with anyone around the world, while allowing to work from anywhere on any workstation. Deploying software on your servers using versioned packaged is considered best practice as it allows you to discover what is installed where and at what version, making it easier to rollback or identifying an issue if any.
Prequisites
The first step is to create a GitHub account, which is simple and well guided. Once completed an account registration, you should create a repository to contain your source. This process is already well documented on many GitHub guides which allows to get started really quick.
Next account required is with Travis CI which, thankfully, only requires you to login using your GitHub credentials, which will ease the synchronisation with your source code. The following steps are required to enable a project to be build, tested, deployed by Travis CI:
- Navigate to Accounts
- Press Sync account to refresh your list of projects (n.b. this step will need to be repeated everytime a new repository is added in GitHub)
- In the list of repositories that has been created, toggle the sliding button to enable the project you want to be built on each commit
- Click on the Settings icon to add any required environment variables (such as path, urls, secure credentials, API keys etc.)
- From your local workstation, create a .travis.yml. file
- Commit the .travis.yml file using git command line or you git client
- Push your commit to GitHub
This should trigger a build in Travis that will probably fail the first time. If it does, congratulations, you have setup Travis correctly to be triggered on each commit!
The last account required with Bintray will also let you login using your GitHub credentials. Once logged in, follow the steps below to setup a repository ready to receive and distribute your Debian packages:
- Login in Bintray using GitHub credentials
- Press on Add New Repository

- On the next screen, you will be asked to fill the repository Name, Type (as Debian), License(s), Description, as illustrated below
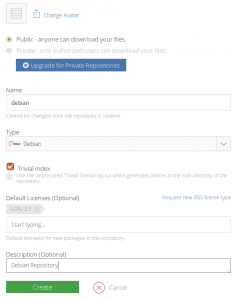
- Press Create
- The creation of the repository should be now completed
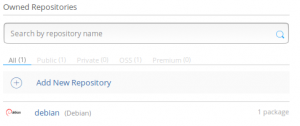
- Click on the repository name you just created
- On the next page, 2 buttons will be of interest for our continuation:
- SET ME UP! to show the various possible command to upload and download on this repository
- Add New Package to create a package before being able to upload (mandatory)
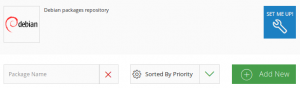
- Click on Add New Package
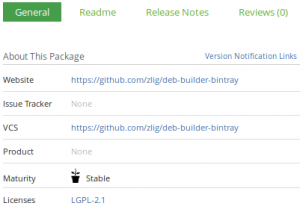
- On the next screen, you will be asked to fill the package Name, Description, License(s), Maturity, Version Control, etc. as illustrated below
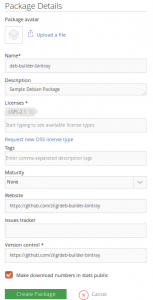
- Once completed, you will be able to click on the package name and review the details
- That’s all, you have setup Bintray to receive your package
Bintray API key
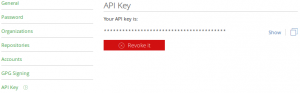
Before edition the Travis configuration with our details, we need to take note of Bintray authentication credentials: Username and API Key. The username should be the same as in GitHub if you authenticated using GitHub credentials, otherwise you can see it by looking in the top right corner of the page. The Bintray API Key is itself hiddent from direct view. To access it you need to:
- Click on your username on the top right corner of the page
- Click on Edit Profile in the menu

- Go to API Key
- You can now access the API Key by pressing Show or by pressing the copy button
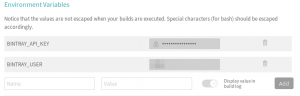
We need to let know Travis of this value by:
- Login in Travis
- Navigate to the Settings page of your repository
- Add a environment variable named BINTRAY_USER containing your username
- Add a hidden environment variable named BINTRAY_API_KEY containing your API key
- The setting page should be similar to
Configuring the process using .travis.yml
Build the .deb file
As already covered in the article Build Debian packages from GitHub using Travis CI, a certain number of files needs to be layed out correctly on your repository to allow creating Debian packages properly. It can take a bit of time to get configured correctly, so consider taking the time to try locally by running the dpkg-deb –build command.
Once you can build you archive properly, we can configure Travis by editing .travis.yml. All what is required to build the package is the following lines:
script:
  # Create the Debian package
  - dpkg-deb --build <package_name>
However, this will only create a <package_name>.deb file in Travis, that we can’t use as is as we need a certain level of versioning to distribute correctly. We will export the package name and a generated version number to be used through out the package:
env:
  global:
  - PACKAGE_NAME=deb-builder-bintray
before_install:
  # Export variables containing versions and filename
  - export RELEASE_VERSION=$(cat VERSION)
  - export BUILD_VERSION=$RELEASE_VERSION.$TRAVIS_BUILD_NUMBER
  - export PACKAGE_NAME_VERSION=$PACKAGE_NAME-$BUILD_VERSION.deb
script:
  # Replace version and build number with the Debian control file
  - sed -i "s/__VERSION__/$BUILD_VERSION/g" $PACKAGE_NAME/DEBIAN/control
  # Create the Debian package
  - dpkg-deb --build $PACKAGE_NAME
  - mv $PACKAGE_NAME.deb $PACKAGE_NAME_VERSION
This will create a much more usable Debian package with the version in the filename and in the DEBIAN/control file.
Uploading the .deb file
We are now ready to upload our Debian package to Bintray!
To instruct how Bintray to do so, we need to add the following sample lines at the end of our Travis configuration:
deploy:
  provider: bintray
  file: bintray_descriptor.json
  user: $BINTRAY_USER
  key: $BINTRAY_API_KEY
  skip_cleanup: true
This will use the credentials we configured previously in Travis as environment variables, but also pass reference to JSON file containing all the details for the package to be uploaded to Bintray. There’s many properties available so refer to the Travis: Deploy to Bintray documentation for further details, or study the sample bintray_descriptor.json file in Appendix of this article.
Once completed the configfuration of Travis and Bintray via the configuration and descriptor file, you can commit and push your code to GitHub, which will trigger a build, create the pacakge and upload to Bintray!
Note: It appears that the Bintray provider does not handle any error in Travis, so if the build pass correctly in Travis, but you don’t view your package uploaded to Bintray, study the logs and possibly attempt the operation via the curl commands provided in the SET ME UP! button to identifiy the source of the issue.
Installation of Debian Package(s) from Bintray
With you package upload and ready to use in Bintray, the next step is to inform your team and user how to install your software. This is really simple thanks to the great apt-get tool, which install software with their required dependencies.
# Adds repository to list of available sources, and refresh
echo "deb https://dl.bintray.com/<bintray_user>/<bintray_repository> /" | sudo tee -a /etc/apt/sources.list.d/<bintray_user>.list
sudo apt-get update

# install package
sudo apt install <package_name>
Resources
- Bintray
- Bintray Debian Repository Meta-Data
- Build Debian packages from GitHub using Travis CI
- Travis: Deploy to Bintray
- stob (project in GitHub making extensive use of Bintray)
Appendix
.travis.yml
This sample Travis configuration is complete to build a Debian package, upload to Bintray, and compare the SHA256 sums of the local and remote packages. It uses multiple variables to avoid repetition.
##############################################################################################
#
# Travis CI configuration file
#
# Set the required secrets in the build settings of the project:
#   - BINTRAY_USER
#   - BINTRAY_API_KEY
#
##############################################################################################
env:
  global:
  - PACKAGE_NAME=deb-builder-bintray
  - BINTRAY_REPO_NAME=debian
  - BINTRAY_LICENSE=LGPL-2.1

before_install:
  # Export variables containing versions and filename
  - export RELEASE_VERSION=$(cat VERSION)
  - export BUILD_VERSION=$RELEASE_VERSION.$TRAVIS_BUILD_NUMBER
  - export BUILD_DATE=$(date "+%Y%m%d")
  - export PACKAGE_NAME_VERSION=$PACKAGE_NAME-$BUILD_VERSION.deb

script:
  # Replace version and build number with the Debian control file
  - sed -i "s/__VERSION__/$BUILD_VERSION/g" $PACKAGE_NAME/DEBIAN/control
  - sed -i "s/__DATE__/$BUILD_DATE/g" $PACKAGE_NAME/DEBIAN/control
  # Create the Debian package
  - dpkg-deb --build $PACKAGE_NAME
  - mv $PACKAGE_NAME.deb $PACKAGE_NAME_VERSION

after_success:
  # Output detail on the resulting package for debugging purpose
  - ls -l $PACKAGE_NAME_VERSION
  - dpkg --contents $PACKAGE_NAME_VERSION
  - md5sum $PACKAGE_NAME_VERSION
  - sha256sum $PACKAGE_NAME_VERSION
  - export LOCAL_SHA256=$( sha256sum $PACKAGE_NAME_VERSION | cut -d " " -f1 )

before_deploy:
  # Set the packages name and details in the descriptor file
  - sed -i "s/__NAME__/$PACKAGE_NAME/g" bintray-descriptor.json
  - sed -i "s/__REPO_NAME__/$BINTRAY_REPO_NAME/g" bintray-descriptor.json
  - sed -i "s/__SUBJECT__/$BINTRAY_USER/g" bintray-descriptor.json
  - sed -i "s/__LICENSE__/$BINTRAY_LICENSE/g" bintray-descriptor.json
  - sed -i "s/__VERSION__/$BUILD_VERSION/g" bintray-descriptor.json

deploy:
  # Upload debian packages to Bintray
  provider: bintray
  file: bintray-descriptor.json
  user: $BINTRAY_USER
  key: $BINTRAY_API_KEY
  skip_cleanup: true

after_deploy:
  # Add time delay to let the servers process the uploaded files
  - sleep 180
  # Retrieve SHA256 sum and compare with local sum to ensure correct file uploaded
  - export REMOTE_SHA256=$(curl -L -v --silent https://bintray.com/$BINTRAY_USER/$BINTRAY_REPO_NAME/download_file?file_path=Packages.gz | zcat | grep -A 3 $PACKAGE_NAME_VERSION | grep SHA256 | cut -d " " -f2)
  - echo "REMOTE_SHA256: $REMOTE_SHA256"
  - >
    if [[ "$LOCAL_SHA256" != "$REMOTE_SHA256" ]]; then
      echo "SHA256 sums don't match: $LOCAL_SHA256 vs $REMOTE_SHA256"
      travis_terminate 1;
    fi
  # Place link to the file in download list
  - |
    curl --silent --show-error --fail\
    -X PUT -H "Content-Type: application/json" -d'{"list_in_downloads": true}'\
    -u$BINTRAY_USER:$BINTRAY_API_KEY https://api.bintray.com/file_metadata/$BINTRAY_USER/$BINTRAY_REPO_NAME/$PACKAGE_NAME_VERSION
bintray-descriptor.json
This is a sample descriptor.json file to instruct Travis how to upload the package to Bintray. It has been tested but expected the .deb files to be located at the root level of the repository after creation.
{
    "package": {
        "name": "__NAME__",
        "repo": "__REPO_NAME__",
        "subject": "__SUBJECT__"
    },

    "version": {
        "name": "__VERSION__",
        "desc": "__NAME__ __VERSION__ by __SUBJECT__"
    },

    "licenses": ["__LICENSE__"],

    "desc": "Debian package built and deployed completely automatically",

    "files": [
        {
            "includePattern": "./(.[^/]*(\\.deb)$)",
            "uploadPattern": "$1",
            "matrixParams": {
                "deb_distribution": "unstable",
                "deb_component": "main",
                "deb_architecture": "amd64"
            }
        }
    ],

    "publish": true,

    "override": false
}
Sample GitHub Repository
The deb-builder-bintray project is a sample repository in GitHub to illustrate how to package a Debian package and upload it to Bintray to allow distributing it.