In this article, we are going to build up on the process we reviewed to Distribute Debian Packages using Bintray by adding the GPG signing of out packages using the builtin feature.
Signing Packages
In the previous process, the users trying to install the packages from your Bintray repository would receive the following error when running apt-get update:
$ sudo apt-get update
Ign:1 http://dl.google.com/linux/chrome/deb stable InRelease
Hit:2 http://ie.archive.ubuntu.com/ubuntu xenial InRelease
Hit:3 http://archive.canonical.com/ubuntu xenial InRelease
  ...
Hit:16 https://download.sublimetext.com apt/stable/ InRelease
Get:17 https://dl.bintray.com/repository/debian Release [815 B]
Ign:18 https://dl.bintray.com/repository/debian Release.gpg
Get:19 https://dl.bintray.com/repository/debian Packages [1,539 B]
Fetched 2,354 B in 1s (1,414 B/s)
Reading package lists... Done
W: The repository 'https://dl.bintray.com/repository/debian Release' is not signed.
N: Data from such a repository can't be authenticated and is therefore potentially dangerous to use.
N: See apt-secure(8) manpage for repository creation and user configuration details.
This error occurs because Debian/Ubuntu packaging system requires the packages to be signed, using GPG, to ensure they weren’t tampered with during the transport, and to certify you were the rightful creator. The following steps reference how to generate GPG private and public keys to signing your packages.
Create a GPG Key
Execute the following command to create a GPG key without a passphrase, to simplify automation or, in our case, to simplify using Bintray to sign any new packages uploaded to it.
$ gpg --expert --gen-key
Follow the steps from the tool, inputting your information and your details as requested.
During the creation, the program will require your operating system to create some entropy, randomness, to ensure the uniqueness of the key. Generally, you are required to navigate few other programs and move your mouse around randomly, but if you are on server without a graphical interface, you may want to run the following commands either in the background or in another shell session, which will speed up the process.
# Generate entropy with:
$ find /dev/disk/by-uuid/ -type l | xargs md5sum
$ rngd -r /dev/urandom
Publish
Once your key was created, you will need to publish your key to let the world access your GPG public key to verify the packages were indeed signed by who they claim to be. To do so, you need to list the keys on your system and take note of the GPG Key ID:
$ gpg --list-secret-keys
/home/username/.gnupg/secring.gpg
-------------------------------
sec   2048R/<GPGKEYID> 2015-05-15
uid                  <Full Name> (<Description>) <email@example.com>
ssb   2048R/<GPGPUBID> 2015-05-15
And then, publish the key using the GPG Key ID:
$ gpg --keyserver keyserver.ubuntu.com --send-keys <GPGKEYID>
gpg: sending key <GPGKEYID> to hkp server keyserver.ubuntu.com
Export GPG Keys to readable text file
In the next step, the GPG public and private keys fille be exported to a text file to allow copy-pasting from it.
- GPG Public Key
# Retrieve the ID of your Public Key (second column)
$ gpg --list-keys

# Export you GPG Public Key
$ gpg --armor --export-keys <GPG_PUBLIC_KEY_ID> > <exported_gpg_public_key.asc>
- GPG Private Key
# Retrieve the ID of your Private Key (second column)
$ gpg --list-secret-keys

# Export you GPG Private Key
$ gpg --armor --export-secret-keys <GPG_PRIVATE_KEY_ID> > <exported_gpg_private_key.asc>
Adding the GPG Keys to your Bintray account
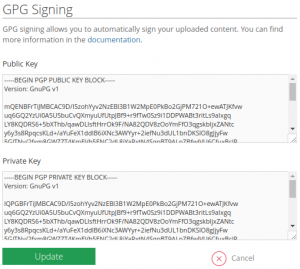
The final section adds both your public and private keys to your Bintray user, or organisation, profile by following these steps:
- Login in Bintray using GitHub credentials
- Click on your username or organisation name on the top right corner of the page
- Click on Edit Profile in the menu

- Go to GPG Signing
- Click on Add Private Key
- In the box named Public Key in the GPG Signing page, input the public key itself
- To do so, paste the contents from the file <exported_gpg_public_key.asc> generated in the previous section in this box
- Click on Add Private Key link under the box
- In the box named Private Key that expanded, input the private key itself
- To do so, paste the contents from the file <exported_gpg_private_key.asc> generated in the previous section in this box
- Click the Update button on the form with both Public Key and Private Key filled with your contents

- Click the Update button
All the packages uploaded using this user or organisation will now be automatically signed by Bintray, and your users won’t receive anymore warnings!

